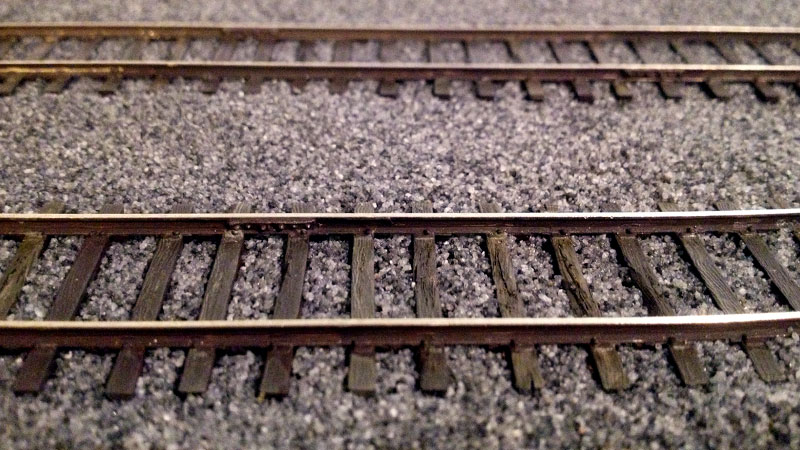
I am especially happy with how well the track weathering and details turned out. Though I would still like to add some light rust to the rails and joint bars.
About the MFR
Sunday, September 8, 2013
A Start on Scenery
I was able to get a good start on scenery this past weekend including laying down a base of ground foam as well as weathering and ballasting the yard tracks. Say goodbye to the Plywood Pacific!
Tuesday, September 3, 2013
Laboring on the Weekend
I've had that model railroading bug in me again lately so I put that motivation to good use and I'm rather happy with the amount of laboring I was able to get done on my railroad this Labor Day weekend.
I started by completing all of the basic foam contours that would make up the terrain on my layout. I trimmed and shaped 2" extruded foam and 2" floral foam and hot glued them into place on the layout. Once secure, I went back over it with a saw to clean up rough edges and create the final shape.
The green floral foam is nice in that it is easy to secure trees into. (or so I am told.) I'm pretty happy with the overall look of the box canyon scene at this point. I'm starting to get a better idea of how this area will look when finished. It's exciting to see it take shape!
Once that job was complete, I was feeling rather bold, so I decided to start the process of painting my track. To avoid conductivity issues, I carefully taped off the switch points for all of my turnouts with masking tape. I then applied a base coat of Rustoleum dark brown spray paint straight from the can.
I've read that most of the master model railroaders use an airbrush and airbrush paints for this process. I don't have an airbrush yet and I was concerned that all my hard work detailing the track would be ruined by cheap spray paint. However, once I saw that Rustoleum straight from the can was the same technique that Mike Confalone uses on his Allagash Railroad, I went for it without hesitation.
Once dried, I decanted a small amount of spray paint into a jar and touched up the switch points being careful not to get paint in the areas where electrical contact is important. (Click here for more information on decanting spray paint.)
I'm only part of the way through the process of painting the track, but the results so far are great! the individually distressed ties look especially good which is only encouraging me to go back and beat them up some more.
More to come soon!
Thursday, August 29, 2013
Construction Photo Dump
While I was cleaning up and organizing some photos on my computer, I ran across a number of older layout construction photos that I've neglected to post on my blog. These aren't the greatest photos ever, but I'll go ahead and dump them all here for those interested in seeing how the sausage was made.
So, shortly after I had built the benchwork and glued down the foam surface, I began laying out the track and sizing up my options. At this point in the process I had my track plan pretty much solidified on paper, but I was unsure of how well it would fit into the actual available space. I laid the track and turnouts out carefully on the surface and found that I would have to modify few of the turnouts by shortening them in order to make best use of the space available.
After carefully marking the locations of all track and turnouts on the surface of the foam, I glued the cork roadbed in place using wood glue and thumb tacks to secure the cork and red wine to lubricate the brain.
Here the track is being laid down. For this step I switched to white glue. This type of glue holds the track firmly in place, but allows me to easily pull the track up off of the cork if adjustments or repairs are required, no nails needed! (Note the boxcar which I used to test the transition between turnouts and flex track to ensure that everything flowed as smoothly as possible.)
All of my rail is code 83, but to give the impression of lighter, less-used rail I removed every 3rd or 4th tie from my flextrack and spaced out the remaining ties to fill in the gaps. To aid in the process, I created a template to help keep the spacing fairly consistant though I did adjust the individual ties a bit to allow for some larger gaps and kinked a few of the ties to simulate old, worn-down track. (Note the difference in tie spacing before and after adjustment between the ties on the left and right side)
I eventually got tired of looking at that drab, brown, unpainted backdrop and so I grabbed a quart of greyish-blue interior house paint and a small roller and got to work.
After the paint dried I glued several lengths of painted wood trim to the top and sides of the hardboard to nicely frame the backdrop as well as to help prevent warping over time (hopefully!)
Well there you go, If you have any questions about any of the steps I took along the way, Just leave a comment below!
Saturday, August 17, 2013
Winter is Coming...
I've done very little to update my layout in recent months. It's just too sunny and pretty outside! I have been slowly working on adding the last of the joint bars to the track in preparation for painting, but that is about it. Oh well, winter is coming soon enough and I am sure that layout progress will pick up significantly then.
Monday, April 22, 2013
Enough HO scale pine trees to put me away for 30 years.
So here is a funny story...
I've been having issues with my sewer line recently, so I called out a local plumbing service to clear it out. My wife who is usually nervous to have strangers in the home asked that I stay there to deal with the guys when they came out. I apologized and explained that I needed to be at work today which did not make her too happy.
A couple of younger guys came out to my house and set to work in the basement. While my wife was down there with them showing them the issue, one of them saw my workbench and saw the large number of scale pine trees that I had laid out to work on.
"Whoa! Is this pot?!" He excitedly asked as his sniffed the little model tree.
My wife turned to him and said. "You are surrounded by model trains right now. What do you think?"
He seemed confused.
"No." she said rolling her eyes. "That's an HO scale pine tree. Not pot."
He still seemed confused... and also disappointed.
Thankfully he wasn't both confused and outraged, because I bet I had a kilo of HO scale pine trees laid out on that work bench. That's enough to put me away for 30 years at least!
I've been having issues with my sewer line recently, so I called out a local plumbing service to clear it out. My wife who is usually nervous to have strangers in the home asked that I stay there to deal with the guys when they came out. I apologized and explained that I needed to be at work today which did not make her too happy.
A couple of younger guys came out to my house and set to work in the basement. While my wife was down there with them showing them the issue, one of them saw my workbench and saw the large number of scale pine trees that I had laid out to work on.
"Whoa! Is this pot?!" He excitedly asked as his sniffed the little model tree.
My wife turned to him and said. "You are surrounded by model trains right now. What do you think?"
He seemed confused.
"No." she said rolling her eyes. "That's an HO scale pine tree. Not pot."
He still seemed confused... and also disappointed.
Thankfully he wasn't both confused and outraged, because I bet I had a kilo of HO scale pine trees laid out on that work bench. That's enough to put me away for 30 years at least!
Sunday, March 10, 2013
Painted Fascia
Today I painted the fascia for my layout. I was considering holding off on this until after I had the scenery mostly in place, but I thought that tidying up the layout a bit might be good encouragement. I considered many different colors for my fascia, (especially a shade of light cream color found on the stunning Grimes Line Layout) but ultimately I felt black would do the best job of framing my scene and drawing the viewers eye in.
Thursday, March 7, 2013
Layout Progress Video #3
I finally got around to creating another progress video.
I've started using the iPhone 4s with the iMovie app to record, edit, and publish the video. It's a bit quirky to use and I haven't had an HD video successfully published to YouTube yet, but It is very convenient and will hopefully encourage me to produce videos more often.
Subscribe to:
Posts (Atom)