
Monday, September 30, 2013
Come Ride the Lions Club Excursion Train!
Here is another video for the Lions Club Excursion Train which shows a view of the Box Canyon Bridge that I had not seen before. It looks like creating my scratchbuilt version of the bridge will be more tricky than I had originally envisioned...
Monday, September 23, 2013
Gone Muddin'
I didn't get quite as far on scenery as I wanted this weekend, but I was able to get all of the cracks and rough areas along the seams of the stacked foam layers filled in and smoothed out using Mike Confalone's "Universal Mud" technique as described in his scenery videos. Out of respect for Mike's work, I don't want to give away his technique here. Instead, I'll point you to where you can purchase his videos and learn how he does it yourself. He does discuss his techniques in great detail and I've found his videos to be worth their weight in gold.


I was also able to run through three full operating sessions on Sunday and I found a few more rough areas in the trackwork I needed to fix before I finish ballasting the layout. Good thing I discovered these rough spots now instead of later.
Sunday, September 15, 2013
Layout Progress Video #4
I figure it's about time I created another layout progress video. We get to see a train work the yard tracks in this one!
Wednesday, September 11, 2013
A Plausible History
 | |
|
I hopped on to Google to research the location I chose for my modeling and from that research I developed a timeline of events important to the development of the MFTR as it "exists" today. Many of these events are historically accurate. (Such as the the construction of the original rail line in 1909.) Other events are completely fictional and serve as justification for the choices I've made in my modeling. (Such as the cement operations moving from it's original location to the town of Ione) Still others are minor tweaks of real events. (Such as the change in management and direction at the Ponderay Paper Recycling Co.)
With that in mind, here is a brief "history" of railroading in the Pend Oreille Valley: (Updated for the new layout)
- 1892 - The Great Northern Railroad (GN) reached Newport Washington enabling shipment of timber towed upstream from mills located along the Pend Oreille River Valley as far north as Metaline Falls.
- 1909 - The Lehigh Portland Cement Co. (Originally Inland Portland Cement Co.) is established in Metaline Falls.
- 1909-1911 - The original line from Newport to the town of Metaline Falls was built by Fredrick Blackwell and given the name Idaho and Washington Northern (I&WN).
- 1925 - A slump in the lumber market led to the sale of the I&WN to the Milwaukee Road.
- 1956 - Construction completed on the Box Canyon Dam.
- 1967 - The Boundry Hydroelectric Dam is built in the northern most area of the Pend Oreille Valley. The dam supplies up to one-third of Seattle City Lights power, It's presence has changed the landscape, permanently submerging the famous Metaline Falls river rapids.
- 1970 - The Great Northern together with the Northern Pacific, (NP) Chicago, Burlington and Quincy, (CBQ) and the Spokane, Portland and Seattle Railway (SP&S) merge to form the Burlington Northern Railroad (BN). This new railroad continued supplying rail traffic to the Pend Oreille Valley.
- *1983 - the Vaagen Brothers Lumber company acquired the valley's largest mill located in the town of Usk.
- 1985 - Soo Line purchased the bankrupt Milwaukee Road and takes over operations in the valley.
- *1988 - The Ponderay Newsprint Co. is founded in Usk bringing with it new economic opportunities.
- 1990 - Canadian Pacific gained full control of the Soo Line.
- *1994 - Continuing to find success in the Pend Oreille Valley, The Lehigh Portland Cement Co. moved operations from it's aging plant in the town of Metaline Falls to a new plant located in nearby Ione. This move saved the railroad 20 miles of travel round trip. The old plant continued to receive occasional loads of cement to store in it's large capacity silos for many years after.
- *1996 - The Burlington Northern merged with the Atchison, Topeka and Santa Fe (ATSF) to form the Burlington Northern and Santa Fe Railway (BNSF). This new railway continues to supply traffic to the valley.
- 1998 - For economic reasons, The BNSF proposes abandonment of the line from Sandpoint to Metaline Falls. Rather than see the line abandoned, the citizens of Pend Oreille County joined together and voted to create the Port of Pend Oreille to operate the Metaline Falls Railroad (MFR). The name honors both the lovely town at the end of the line and it's historic falls. Both of which have contributed greatly to the valley's history..
- *2009 - In an effort to save on the costs of upkeep, the MFR filed for abandonment of the rail line and its several tunnels and wooden trestles north of the Box Canyon Bridge leading to Metaline Falls.
(*These dates represent a fictionalized version of historical events.)
Developing this timeline has been a lot of fun. Not only did I enjoy creating a plausible history for my freelanced railroad, but I also found myself absolutely fascinated by the real history of the Pend Oreille Valley which only increases my desires to do it justice with my fictional representation.
K.I.S.S.
I was standing in my layout room the other night thinking to myself "You know, I could make this layout twice as big if I were to cut a hole into this door, curve the mainline through the closet and back out into the room along this other wall..."
I had to stop myself. I was coming dangerously close to violating one of my personal rules I established for myself when I started this model railroad: Keep It SMALL Stupid. (K.I.S.S.)
I imagine most modelers find themselves longing for larger layouts from time to time. The advantages that come with more layout are hard to ignore, yet there are also plenty of advantages to keeping a layout small and focused as well. Small layouts are cost less to build. Benchwork, wiring and trackwork goes much quicker which gets trains moving sooner. Smaller layouts allow you to focus your attention on modeling finer details that would just be too time consuming to be considered on larger layouts.
For example, I have spent many, many hours individually detailing and weathering ties on my little railroad. Now that job is nearly complete which is good because I am starting to get a bit burned out on track details and I'm ready to move on and try something new. If my layout were twice as big as it is now, I'd only be halfway through the job and frankly, that would be rather discouraging.
I'm 33 years old and know myself well enough by now to know that I may DESIRE to have a big layout from time to time. However, I also know that keeping the layout small and manageable keeps me from getting burned out which keeps me excited about the hobby.
Besides, I've got a mountain to build, trees and a river to model, buildings to kitbash and assemble, a highway overpass and railroad bridge to scratch build, cars to weather, and much, much more. I've got enough work on my plate to keep me busy for years!
Sunday, September 8, 2013
A Start on Scenery
I was able to get a good start on scenery this past weekend including laying down a base of ground foam as well as weathering and ballasting the yard tracks. Say goodbye to the Plywood Pacific!


I am especially happy with how well the track weathering and details turned out. Though I would still like to add some light rust to the rails and joint bars.
Tuesday, September 3, 2013
Laboring on the Weekend
I've had that model railroading bug in me again lately so I put that motivation to good use and I'm rather happy with the amount of laboring I was able to get done on my railroad this Labor Day weekend.
I started by completing all of the basic foam contours that would make up the terrain on my layout. I trimmed and shaped 2" extruded foam and 2" floral foam and hot glued them into place on the layout. Once secure, I went back over it with a saw to clean up rough edges and create the final shape.


I started by completing all of the basic foam contours that would make up the terrain on my layout. I trimmed and shaped 2" extruded foam and 2" floral foam and hot glued them into place on the layout. Once secure, I went back over it with a saw to clean up rough edges and create the final shape.

The green floral foam is nice in that it is easy to secure trees into. (or so I am told.) I'm pretty happy with the overall look of the box canyon scene at this point. I'm starting to get a better idea of how this area will look when finished. It's exciting to see it take shape!

Once that job was complete, I was feeling rather bold, so I decided to start the process of painting my track. To avoid conductivity issues, I carefully taped off the switch points for all of my turnouts with masking tape. I then applied a base coat of Rustoleum dark brown spray paint straight from the can.
I've read that most of the master model railroaders use an airbrush and airbrush paints for this process. I don't have an airbrush yet and I was concerned that all my hard work detailing the track would be ruined by cheap spray paint. However, once I saw that Rustoleum straight from the can was the same technique that Mike Confalone uses on his Allagash Railroad, I went for it without hesitation.
Once dried, I decanted a small amount of spray paint into a jar and touched up the switch points being careful not to get paint in the areas where electrical contact is important. (Click here for more information on decanting spray paint.)

I'm only part of the way through the process of painting the track, but the results so far are great! the individually distressed ties look especially good which is only encouraging me to go back and beat them up some more.

More to come soon!
Thursday, August 29, 2013
Construction Photo Dump
While I was cleaning up and organizing some photos on my computer, I ran across a number of older layout construction photos that I've neglected to post on my blog. These aren't the greatest photos ever, but I'll go ahead and dump them all here for those interested in seeing how the sausage was made.
So, shortly after I had built the benchwork and glued down the foam surface, I began laying out the track and sizing up my options. At this point in the process I had my track plan pretty much solidified on paper, but I was unsure of how well it would fit into the actual available space. I laid the track and turnouts out carefully on the surface and found that I would have to modify few of the turnouts by shortening them in order to make best use of the space available.


So, shortly after I had built the benchwork and glued down the foam surface, I began laying out the track and sizing up my options. At this point in the process I had my track plan pretty much solidified on paper, but I was unsure of how well it would fit into the actual available space. I laid the track and turnouts out carefully on the surface and found that I would have to modify few of the turnouts by shortening them in order to make best use of the space available.

After carefully marking the locations of all track and turnouts on the surface of the foam, I glued the cork roadbed in place using wood glue and thumb tacks to secure the cork and red wine to lubricate the brain.

Here the track is being laid down. For this step I switched to white glue. This type of glue holds the track firmly in place, but allows me to easily pull the track up off of the cork if adjustments or repairs are required, no nails needed! (Note the boxcar which I used to test the transition between turnouts and flex track to ensure that everything flowed as smoothly as possible.)

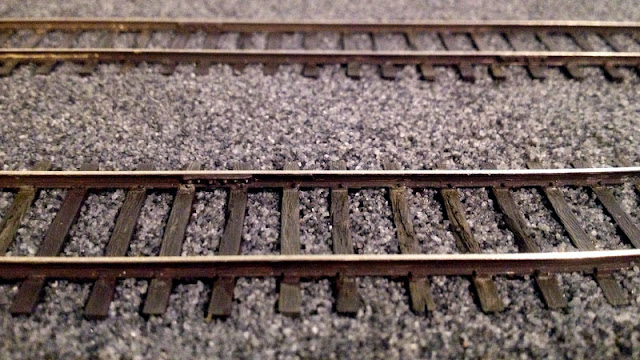
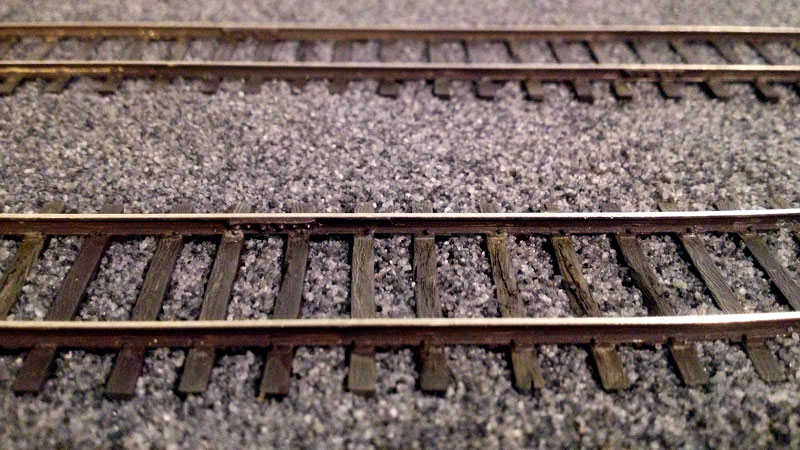
All of my rail is code 83, but to give the impression of lighter, less-used rail I removed every 3rd or 4th tie from my flextrack and spaced out the remaining ties to fill in the gaps. To aid in the process, I created a template to help keep the spacing fairly consistant though I did adjust the individual ties a bit to allow for some larger gaps and kinked a few of the ties to simulate old, worn-down track. (Note the difference in tie spacing before and after adjustment between the ties on the left and right side)

I eventually got tired of looking at that drab, brown, unpainted backdrop and so I grabbed a quart of greyish-blue interior house paint and a small roller and got to work.

After the paint dried I glued several lengths of painted wood trim to the top and sides of the hardboard to nicely frame the backdrop as well as to help prevent warping over time (hopefully!)

Well there you go, If you have any questions about any of the steps I took along the way, Just leave a comment below!
Saturday, August 17, 2013
Winter is Coming...
I've done very little to update my layout in recent months. It's just too sunny and pretty outside! I have been slowly working on adding the last of the joint bars to the track in preparation for painting, but that is about it. Oh well, winter is coming soon enough and I am sure that layout progress will pick up significantly then.


Monday, April 22, 2013
Enough HO scale pine trees to put me away for 30 years.
So here is a funny story...
I've been having issues with my sewer line recently, so I called out a local plumbing service to clear it out. My wife who is usually nervous to have strangers in the home asked that I stay there to deal with the guys when they came out. I apologized and explained that I needed to be at work today which did not make her too happy.
A couple of younger guys came out to my house and set to work in the basement. While my wife was down there with them showing them the issue, one of them saw my workbench and saw the large number of scale pine trees that I had laid out to work on.
"Whoa! Is this pot?!" He excitedly asked as his sniffed the little model tree.
My wife turned to him and said. "You are surrounded by model trains right now. What do you think?"
He seemed confused.
"No." she said rolling her eyes. "That's an HO scale pine tree. Not pot."
He still seemed confused... and also disappointed.
Thankfully he wasn't both confused and outraged, because I bet I had a kilo of HO scale pine trees laid out on that work bench. That's enough to put me away for 30 years at least!
Sunday, March 10, 2013
Painted Fascia
Today I painted the fascia for my layout. I was considering holding off on this until after I had the scenery mostly in place, but I thought that tidying up the layout a bit might be good encouragement. I considered many different colors for my fascia, (especially a shade of light cream color found on the stunning Grimes Line Layout) but ultimately I felt black would do the best job of framing my scene and drawing the viewers eye in.


Thursday, March 7, 2013
Layout Progress Video #3
I finally got around to creating another progress video.
I've started using the iPhone 4s with the iMovie app to record, edit, and publish the video. It's a bit quirky to use and I haven't had an HD video successfully published to YouTube yet, but It is very convenient and will hopefully encourage me to produce videos more often.
I've started using the iPhone 4s with the iMovie app to record, edit, and publish the video. It's a bit quirky to use and I haven't had an HD video successfully published to YouTube yet, but It is very convenient and will hopefully encourage me to produce videos more often.
Saturday, March 2, 2013
Painting a Backdrop
I spent the past week painting a backdrop for my model railroad. I was nervous going into the project, but the process was pretty simple and straight-forward and I could not be happier with the results.

Backdrop Philosophy
Backdrops are an interesting beast. There are many philosophies as to what the role of a model railroad backdrop should be and which technique best achieves that role. Some will say that painting a quick and simple, flat blue sky and perhaps a hint of distant hills is best for giving an impression of an extended environment while also not drawing too much attention to itself and allowing the focus of the scene to remain on the models. Others will argue that a highly detailed, extremely realistic backdrop composed of mostly photographic elements will help to set your models into the scene and is less likely to betray the effect of realism that model railroaders strive for in their work. My opinion on what makes an effective backdrop falls somewhere in between.
An extremely simple backdrop consisting of a flat-blue sky and perhaps some sponge-painted hills can be very effective in urban and rural plains scenes. But I've seen examples of railroads set in mountainous terrain where that effect can look rather cartoonish and can become a big distraction. Mountains are naturally very dramatic locals and they really demand careful attention be paid to effectively create the impression of realism.
Photo backdrops have become very popular in recent years and there are some truly stunning examples of the realism that photo backdrops provide. Mike Confalone's Allagash Railway is a perfect example of this and It's hard to argue with those kind of results, yet I have seen examples where such realism in the backdrop actually makes the modeled elements look worse by comparison. Particularly in scenes where less-than-stellar tree models need to stand side-by-side with photographs. Also, the color balance of many photo backdrops often differ slightly from the modeled portion of the scene which can also draw attention to itself and distract the viewers attention from the scene.
In most situations, I feel that the best approach is a carefully painted backdrop with a medium amount of detail. This approach blend nicely with the modeled scenery without becoming a distraction. Bernie Kempinski's USMRR is the perfect example of the effectiveness of this technique.
Preparing to Paint

The first step was to gather all the paints and supplies I'd need to complete the layout. This Included:
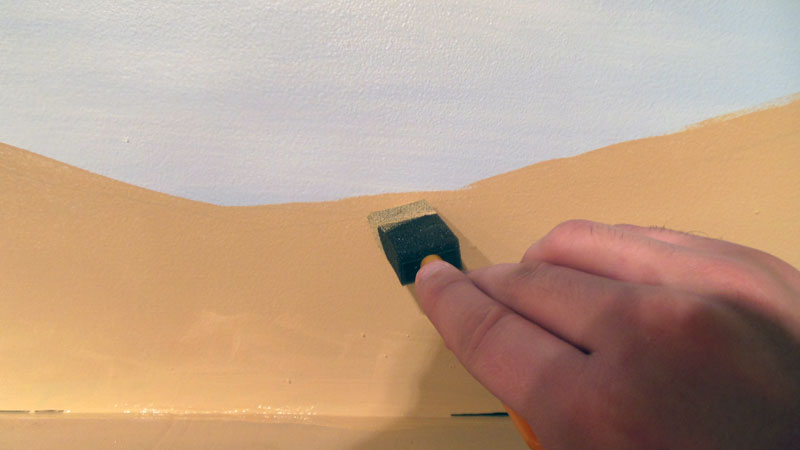
 After the sky was done, I penciled in the ridge line for the distant mountains using photographs of the prototype as reference. I then rolled on a layer of tan enamel house paint and used a small sponge brush to clean up the edges.
 Once the paint dried, I set to work creating distant trees. This is accomplished by painting trees in a series of progressively darker, less blue, layers. The final effect gives the appearance of depth as hills that are farther away appear lighter than nearer hills due to atmospheric effects.
Using photographs as refrence, I mixed up a very large amount of paint to simulate the most distant layer of trees. This color was a mix of Cadmium Yellow, Cerulean Blue, Titanium White, and a bit of Mars Black. (Mars Black is a very powerful color and a little bit goes a long way when mixing colors) I applied the paint to the backdrop with a brush using short, vertical strokes. These strokes give the appearance of tall, thin, distant pine trees.
Next I mixed up a somewhat darker, more green mix of paint using the paint left over from the first coat and applied it slightly lower on the canvas using the same vertical strokes. This simulates a tree line that is not quite as far away. A final mix of darker, more olive green paint was used to create the nearest tree line. I took the extra step of adding some branch detail to this layer to which gives the appearance of closer, more visible trees.
Painting Trees
 Large, detailed trees can be a bit tricky. I'd suggest practicing on a scrap piece of hardboard to get a result you are happy with before attacking your backdrop head on. Also, take a look at some tutorial videos online to see how other accomplished artists create their own trees. My technique is a result of years of my youth spent watching Bob Ross paint pine trees on PBS.
Don't worry too much about making perfect trees. In my case, most of these will be covered by modeled trees and building flats. These painted trees exist mainly to give an impression of a thick, dense forrest and so color is more important here than detail. I would suggest having a few modeled trees available as reference to match colors to. That way the backdrop will blend seamlessly into the rest of the layout.
I began by mixing a thick, dark green color using mostly Cadmium Yellow and Mars Black with a hint of Hookers Green and Cerulean Blue for good measure. If you find that your color is too saturated, try adding some Titanium White to the mix to dull it a bit. (PRO TIP: mixes of Cadmium Yellow and Mars black in various amounts will give you colors that very nearly match many of the shades of green found in most Woodland Scenics products)
I applied the paint to the backdrop using a fan brush starting with small branches at the top of the tree and working my way down from there. I tried to create trees of various sizes and shapes to add a bit of character to the forest and to avoid it turning into a solid wall of green. Once that coat dried, I went back over it with a lighter shade of green being careful not to cover too much of the dark green as that is meant to represent the shadowy areas of the tree. A final coat of lighter green with a hint of Cadmium Yellow for highlights and the trees were done for the moment.
Painting Ground Cover and Details
 I added ground cover by first painting in the areas to be covered with melting snow. Then I added dead grasses and weeds. I created the look of dead grass by using a small brush to apply the paint in short, quick upward strokes. The color was a combination of various shades of brown created by mixing Cadmium Yellow, Raw Siena, Titanium White and a hint of Mars Black.
 I simulated the look of bushes, and soft grass, by applying various shades of brown with a soft bristled brush in quick, stabbing motions. Deciduous trees and Pine trunks were added with a small flat brush to bring a bit more detail to the scene. I panted the trunk detail in two different colors of grey created by mixing Titanium White, Mars Black, and a small amount of Raw Siena.
Finally, upon review I decided to add a few young saplings and dead trees in various spots to break up the monotonous look of a wall of perfect pines.
A World of Difference
If you are putting off painting your backdrop because you are afraid of messing it up, don't be. If you do screw up, you can always paint over it and try again. It took me several tries to get this backdrop just right and I had to repaint some areas several times until I had the color just right. It's an easy fix and it's better to do it at this stage than to try and fix a backdrop that you're not happy with after all of the hills and trees and plaster castings have gone in.
I must admit I was dreading painting my own backdrop. It had been years since I last picked up a brush to paint anything and I really didn't want to screw it up. But I gotta tell ya, the addition of a painted backdrop makes a world of difference on my model railroad. I haven't added any real scenery yet, but already it feels like my trains are moving through a real location instead of rolling over a piece of painted foam. This has me excited to run trains and to get going on my next model railroad project.


Backdrop Philosophy
Backdrops are an interesting beast. There are many philosophies as to what the role of a model railroad backdrop should be and which technique best achieves that role. Some will say that painting a quick and simple, flat blue sky and perhaps a hint of distant hills is best for giving an impression of an extended environment while also not drawing too much attention to itself and allowing the focus of the scene to remain on the models. Others will argue that a highly detailed, extremely realistic backdrop composed of mostly photographic elements will help to set your models into the scene and is less likely to betray the effect of realism that model railroaders strive for in their work. My opinion on what makes an effective backdrop falls somewhere in between.
An extremely simple backdrop consisting of a flat-blue sky and perhaps some sponge-painted hills can be very effective in urban and rural plains scenes. But I've seen examples of railroads set in mountainous terrain where that effect can look rather cartoonish and can become a big distraction. Mountains are naturally very dramatic locals and they really demand careful attention be paid to effectively create the impression of realism.
Photo backdrops have become very popular in recent years and there are some truly stunning examples of the realism that photo backdrops provide. Mike Confalone's Allagash Railway is a perfect example of this and It's hard to argue with those kind of results, yet I have seen examples where such realism in the backdrop actually makes the modeled elements look worse by comparison. Particularly in scenes where less-than-stellar tree models need to stand side-by-side with photographs. Also, the color balance of many photo backdrops often differ slightly from the modeled portion of the scene which can also draw attention to itself and distract the viewers attention from the scene.
In most situations, I feel that the best approach is a carefully painted backdrop with a medium amount of detail. This approach blend nicely with the modeled scenery without becoming a distraction. Bernie Kempinski's USMRR is the perfect example of the effectiveness of this technique.
Preparing to Paint

The first step was to gather all the paints and supplies I'd need to complete the layout. This Included:
- A quart of light, greyish-blue flat enamel paint
- A quart of tan flat enamel paint (Upon reflection, I probably should have gone with more of a dirt brown color, but this works fine for now.)
- A 4oz tube of Liquitex Basics Mars Black
- A 4oz tube of Liquitex Basics Cerulean Blue Hue
- A 4oz tube of Liquitex Basics Hookers Green Hue
- A 4oz tube of Liquitex Basics Cadmium Yellow Medium Hue
- A 4oz tube of Liquitex Basics Titanium White
- A 2oz tube of Liquitex Raw Siena
- A 8oz bottle of Liquitex Acrylic Matte Medium
- A pad of Pallet Paper
- A package of assorted cheap brushes and sponge brushes
- A package of assorted cheap pallet knives
Acrylics can be expensive, and you'll need a lot of it to cover your backdrop, so the key here is to be as CHEAP as possible. Liquitex's Basics line of paints are significantly cheaper than their traditional line and stores like Hobby Lobby will sometimes offer them for sale at a deep discount. Artist brushes can be expensive as well, so for an application such as this I recommend getting a package of cheap brushes. These too can be found at Hobby Lobby at about ten bucks for a dozen or so brushes of various shapes and sizes.
Painting the Sky
When painting your backdrop, it's important to start with the most distant elements first and work your way forward from there. With this in mind, I began by painting the sky.
The first step was to roll on a layer of light, greyish-blue flat enamel house paint across the entire backdrop. When selecting a color for your sky, it is important to choose a color that is not too blue. If you take a look at the sky on an average day, you'll find it to be far lighter and more grey than you might initially think.
Once the paint has dried, it was time to add the clouds. Clouds can be difficult to get right. Generally I find that puffy, round, dimensional clouds often look unconvincing. I prefer wispy clouds that add a sense of depth to the sky without drawing too much attention to it.
Using a sheet of pallet paper and a pallet knife I thinned out a large amount of Titanium White with Matte Medium and a bit of water. I then applied the paint to the backdrop with a large soft bristled brush in long horizontal strokes. I placed most of the clouds near the bottom of backdrop and created fewer, larger clouds as I worked my way up the backdrop. This helps to simulate depth in the sky.
After the paint dried, I went back with a slightly thicker mix of Titanium White and Matte Medium and added a few puffy areas on the tops of the clouds to add a bit of definition.
Painting Distant Mountains

Using photographs as refrence, I mixed up a very large amount of paint to simulate the most distant layer of trees. This color was a mix of Cadmium Yellow, Cerulean Blue, Titanium White, and a bit of Mars Black. (Mars Black is a very powerful color and a little bit goes a long way when mixing colors) I applied the paint to the backdrop with a brush using short, vertical strokes. These strokes give the appearance of tall, thin, distant pine trees.
Next I mixed up a somewhat darker, more green mix of paint using the paint left over from the first coat and applied it slightly lower on the canvas using the same vertical strokes. This simulates a tree line that is not quite as far away. A final mix of darker, more olive green paint was used to create the nearest tree line. I took the extra step of adding some branch detail to this layer to which gives the appearance of closer, more visible trees.
Painting Trees

Don't worry too much about making perfect trees. In my case, most of these will be covered by modeled trees and building flats. These painted trees exist mainly to give an impression of a thick, dense forrest and so color is more important here than detail. I would suggest having a few modeled trees available as reference to match colors to. That way the backdrop will blend seamlessly into the rest of the layout.
I began by mixing a thick, dark green color using mostly Cadmium Yellow and Mars Black with a hint of Hookers Green and Cerulean Blue for good measure. If you find that your color is too saturated, try adding some Titanium White to the mix to dull it a bit. (PRO TIP: mixes of Cadmium Yellow and Mars black in various amounts will give you colors that very nearly match many of the shades of green found in most Woodland Scenics products)
I applied the paint to the backdrop using a fan brush starting with small branches at the top of the tree and working my way down from there. I tried to create trees of various sizes and shapes to add a bit of character to the forest and to avoid it turning into a solid wall of green. Once that coat dried, I went back over it with a lighter shade of green being careful not to cover too much of the dark green as that is meant to represent the shadowy areas of the tree. A final coat of lighter green with a hint of Cadmium Yellow for highlights and the trees were done for the moment.
Painting Ground Cover and Details


Finally, upon review I decided to add a few young saplings and dead trees in various spots to break up the monotonous look of a wall of perfect pines.
A World of Difference
If you are putting off painting your backdrop because you are afraid of messing it up, don't be. If you do screw up, you can always paint over it and try again. It took me several tries to get this backdrop just right and I had to repaint some areas several times until I had the color just right. It's an easy fix and it's better to do it at this stage than to try and fix a backdrop that you're not happy with after all of the hills and trees and plaster castings have gone in.
I must admit I was dreading painting my own backdrop. It had been years since I last picked up a brush to paint anything and I really didn't want to screw it up. But I gotta tell ya, the addition of a painted backdrop makes a world of difference on my model railroad. I haven't added any real scenery yet, but already it feels like my trains are moving through a real location instead of rolling over a piece of painted foam. This has me excited to run trains and to get going on my next model railroad project.

Wednesday, February 27, 2013
A Trip to Metaline Falls by Rail
Youtube user NorthernWolf76 takes us on a trip along the rail route running between Ione and Metaline Falls Washington. Don't miss the tunnel and the many trestles along the way!
Sunday, February 24, 2013
Backdrop Progress
I'm about halfway through painting my backdrop and I plan on putting together a nice, detailed blog post about it, but until then here is a teaser:


Thursday, January 3, 2013
Using Google Maps as Research for Backdrops
I am very nearly ready to begin painting my backdrop, but before I did, I wanted to gather some photos of the area around Ione Washington so that I could accurately recreate the mountainous vistas of the region.
Gathering photos using the Google Maps street view is an easy way of obtaining accurate images of your chosen prototype, but finding a good angle to view distant landscape features may be difficult because Street View photographs are often obscured by buildings and large trees. The following image shows the area where I acquired most of my reference photos for the backdrop.

As you can see, I ended up having to capture many images from across the river, looking back on the town from a distance. I found it helpful to start in areas where the tree line was sparse.


I plan on using these shots and many others to help identify and create a plausible mountain ridge line when it comes time to slap paint on the backdrop.
Well, That's all for now! I've purchased my supplies for painting the backdrop and now it's just a matter of getting up the courage to start throwing down some paints! Wish me luck!
Subscribe to:
Posts (Atom)