I've spent the last week or so reading through some really great model railroad blogs and wanted to quickly share them with you.
The first of which is Bernie Kempinski's amazing Civil War era model railroad. His modeling is outstanding and his blog is extremely detailed, interesting and entertaining. Here is a railroad that is about as opposite of what I am modeling as you can get and I found that I was absolutely riveted to his blog. (I was up till 3:00 in the morning reading it on my iPad in bed.)
Next up is a series of really awesome picture heavy articles of various historical New York city railroad spots including 28th street yard, Harlem Transfer, Rikers Island, and many many more. The research is exhaustive and the gentleman "Phil" who gathered the information should be commended for his work. I find it so interesting that I am eyeing a spot in the corner of my basement that would make a perfect location for an N-Scale 28th street yard...
Finally, we have the website for a Model Railroad that is in my mind, the gold standard of the type of small, freelanced railroad modeling that inspires me and that is the Washington Northern by Kevin Kiettke. His site is so beautiful and so much fun to explore. I highly recommend everyone take a look at the amazing work that is on display on Kevin's site.

Thursday, December 13, 2012
Wednesday, December 5, 2012
Look At Your Lighting
I mentioned in a recent post that I needed to address the lighting on the layout. I don't have a great great camera and the lighting was just not bright enough in the room to compensate for my lack of skill at taking quality pictures. And so I decided to replace that old light bulb hanging from the ceiling with something that might throw a bit more light on the layout. I ended up getting a cool looking track lighting fixture.


I chose this fixture because I have very low ceilings in the room and I was worried about clearance. I also thought it might be helpful to be able to focus light on specific spots on the layout. Upon turning it on I immediately noticed that by focusing the light directly on the layout, the rest of the room appeared pretty dark in comparison. This does a good job of "framing" the layout and really giving it a dramatic appearance when viewing the layout in person.
So it seems to be an overall improvement but how does my camera like it? I set up a nice little side-by-side comparison test.

Immediately right out of the camera the picture is brighter and crisper. The photo is in better focus and the color is more accurate as well. With a little post processing, I think the image looks pretty good. (although the reds are WAAAAY off. I've gotta figure out how to compensate for that.)

One major upside of the track lighting is that I can focus the light on key scenes, however one major downside is that it casts multiple shadows on the ground which is highly unrealistic. That may need to be addressed before it's over with.
I will continue to investigate ways of improving the lighting and improving my photography, but I gotta say, this is a pretty good start!
Sunday, December 2, 2012
Joint Bars and Hills
This weekend I started the slightly tedious work of adding a large number of Details West JB-921 joint bars to my track. I started by measuring and marking off rail every 39 scale feet. (approx. 5 3/8 inches) I then carefully attached the white metal bars to both the outside and inside of the rail using liquid Medium CA. I also attached my fingers to basically everything in the layout room in the process.
I have not notched the tops of the tracks at the "joint" yet and I am unsure if I will. It seems like there would be a tradeoff of more noise and a rougher ride for rolling stock for what seems like a very minor detail in my mind.
About halfway through the process I came to realize that I was going to be woefully short on joint bars. It takes a surprisingly large amount of them to complete all the trackwork on a layout as small as mine. I've ordered another 12 packages and am currently waiting as patiently as I can for them to arrive so that I can complete the job and glue my fingers together once again.

I noticed while taking pictures that a few of the bars are bent a little bit. The white metal is very flexible and it is kinda difficult to apply them to the rail perfectly straight. Even so, the results look very good and I can't wait to paint them up to see the final result. It is a project that has turned out to be far more expensive than I had initially thought. Given that this is a detail that perhaps 5% of the modelers out there would notice and appreciate, I am not sure it was completely worth it. That said, if I didn't add these little details, it would have bugged me for years. So, at the end of the day, I am happy to have put forth this extra little bit of effort.
I also finally figured out what I wanted to do with a large empty area in the front of the layout. Given that I would have to reach across this area to uncouple cars at the paper recycling company located on the rear tracks, I knew I would be unable to place a delicate structure here. I had a bit of an epiphany when I realized that lowering the fascia and building a small slope would allow me to work the back of the layout in a more relaxed manner and allow for more arm clearance as I reach across scenery. It also gives me a good snail's eye view of trains passing by, so that is an extra bonus!
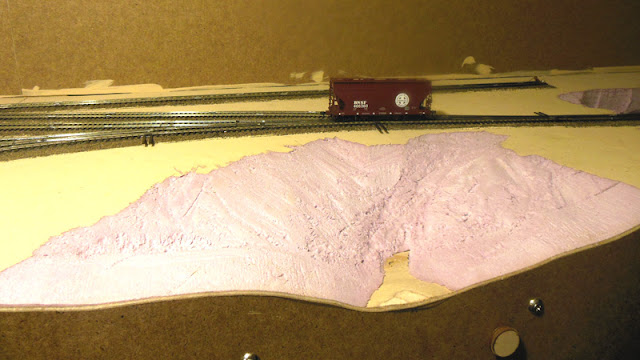
I am excited to finally start into the scenery! Creating scenery is my favorite aspect of the hobby and it feels really great to finally get that going. More to come very soon!
Subscribe to:
Posts (Atom)